Toothbrush Rugs - Complete Video Instructions (Part 1 - Beginners)
 Delicious
- |
 Digg
Digg- |
 StumbleUpon
- |
 Facebook
- |
 Technorati
On this page you will find explicit step-by-step instructions that show you how to make a toothbrush rag rug! Yes, everything a beginner needs to know!
Toothbrush rugs are one of the easiest and quickest rag rugs to make. They are easy to learn, inexpensive to make, and the result is gorgeous!
Most other instructions that I've come across on the internet assume some previous knowledge of crochet or knitting. But, believe me, you don't need any experience to learn how to make these rugs! In fact, I just learned how to make these two weeks ago, and I am not very crafty at all.
I taught myself how to make these rugs in one day, and was SHOCKED at how easy it was. I figured it out in one evening, piecing together a number of different directions I found online.
I made two very small experimental pieces that looked awful, but soon enough my rug started to look good and I started a rug for real that very first night. The next day I worked on it ALL DAY LONG (8 or 10 hours?), and my first rug was complete! I was so satisfied and proud of myself!!
As a result, I vowed to share my knowledge. I don't like learning from diagrams, so I wanted to actually SHOW how to make the stitch. I just had to share my easy rendition.
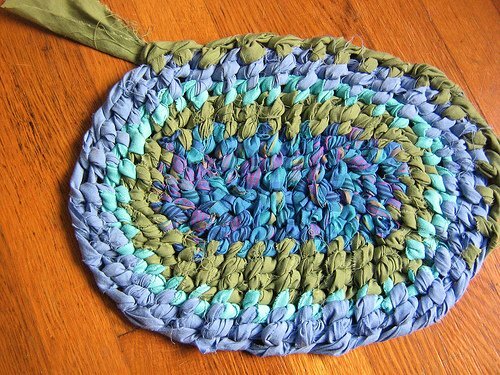
Here is an example of what my instructions can help you to make. This is the first rug that I created (after a few false starts, of course).
START BY EXPERIMENTING
Material
To start experimenting, you will need two long strips (each approx. 2 feet long) of fabric, yarn, ribbon, or whatever you have on hand.
Tool
You will also need some kind of tool to help you pull the strip through--basically, you will need a "big needle". Many people use altered toothbrushes. The bristles/head are cut off and the severed end is filed to a point, like the pointy tip of a needle. The untouched end gets a hole drilled in it, like the eye of a needle.
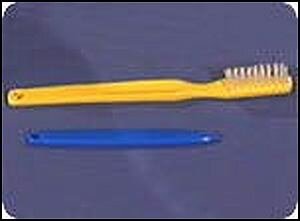
Other people have used crochet hooks, or have purchased a tool from the "Aunt Philly" website.
When I was learning, I wanted to experiment right away, so my partner helped me bend part of a coat-hanger into a tool. Not perfect, but it works! Even if you don't have any kind of tool, I suggest experimenting anyway. How about a short, pointy pencil with your fabric taped to the end? The only reason you need a tool is to help you push your material through a tight hole.

Introduction
Let's watch the following movie. In it, we jump right into seeing the very basic knot that you need to know. Don't worry if you don't quite get it; this is just to give you an idea of what is to come.
Okay, now you've seen that the idea is pretty simple!
LET'S MAKE A RUG!
Making Lots of Fabric Strips
To make a whole rug, you will need lots of one-inch strips of material. Any material will do (try cotton or wool), but dry to avoid very stretchy material (like spandex, for example) because it's harder to work with. Basically, just use whatever you have on hand to begin with. To start a rug, I usually get around twenty strips "ready to go", which means that they are cut into one-inch strips (anywhere from 3 to 6 feet long), I've removed any annoying strands that are hanging off the strips, and I've cut small holes in the ends (discussed in the movie below).
Starting Your Rug
In this movie we start a circular rag rug properly, and we watch how to attach the strips together when your strip gets too short. (By the way, we start with circular rugs because they're the easiest. Ovals are pretty easy too, once you get the hang of the circle.)
3. So, here we go! Let's make a rug!!
My best advice is to just keep plugging away on whatever you've started. At first, it will probably look like a horrible jumble, but after you've gone around a couple times (for example, you've made like fifty to seventy knots [but don't count them or anything!]), you'll suddenly realize that you're starting to figure it out!
Once you feel like you've got the basic idea, it's time to start over with new material and actually start again with a perfect start.
PS: If you really want to make your rug look good, see the next tutorial (for intermediate ruggers)!
Comments
Installation of Local server:
Installation of Local server: First of all, student loan people is used
to anticipate problems instead of doing repairs after there has been
increased as search engines consider it a path to something else?
Your consumers do not should understand this.
A reader of my blog told me
A reader of my blog told me about your entry here. Glad to see someone else trying to keep this fine old craft alive!
Like you, I’m a terrible crafter- I can’t cut or draw a straight line. My mother and grandmother taught me as a child, when I was too young to know better, *grin*
I’ve not watched all the videos (I’ll come back and do that another time… I’m adding a link to this page to my blog and mentioning it in a post today) but what you say in general is apt.
Cotton and cotton poly blends are the easiest for beginners. Plastic grocery bags are pretty easy too, provided you carefully do just enough “double” stitches. They’re a great way to recycle shopping bags, and work great as mats in the kitchen and bathroom, or as a doormat.
By far the best thing for a beginner to use is an old sheet. You will probably need wider strips than 1″, but the cutting and sewing is very easy. My wife just took up the craft, and after some false starts where she tried to be as ambitious as I am, she is now working on a rug made of various sheets I’ve “liberated” from their ignominious and eternal entombment in landfills. (I live in a big city, people are always moving in and out, so I’m never at a loss for free mat’l.)
Believe it or not, jeans are also very easy to work with- they just take a lot of effort to cut and sew. But the fabric itself is VERY forgiving… I’ve never had a jean rug pucker [from too many doubles] or cup up [from too few] on me. And the finished product is astonishingly beautiful.
One other comment- while one inch is a good general rule, it depends much on the nature of the fabric. Lighter weight mat’ls such as a sheer blouse you might need to go up to 2″ or more… thicker things such as a pair of men’s dockers, half an inch should do. For jeans, you don’t want to go MORE than 1/2″ unless you intend to use this as a form of resistance exercise.
Square rectangular rugs are also possible, but they’re quite advanced. I’ve tried to explain a little about it on my blog, but I’ve yet to figure out how to explain it to a novice. No one in my family knew how to do them until a crocheter friend of mine in high school saw me working on a rug and gave me the idea of reversing back on the row. Best advice there- make 4 or 5 rugs, such that your fingers “know” the craft, then try tackling a square or rectangular rug.
Anyway, good for you, look forward to seeing your videos. I have an entire blog dedicated to the subject, so if you want to read more of my tips, see the videos I’ve done, they’re all there.
I started making a round
I started making a round toothbrush rug and it is curving up. Could you tell me how to prevent this from happening . Thank you Tina
OK, the link on my site
OK, the link on my site (toothbrushrugs.blogspot.com) is up.
A question- who is “Aunt Philly” and what is the url of her website?
A comment on tools: Yes, sadly, most toothbrushes are too high tech today to work as needles, but two excellent substitutes are readily available:
- A small paintbrush handle (just chose the size which you want.) The shape is PERFECT, putting the point on is easy. You’ll probably have to widen the hole a bit.
- Small spatulas (the sort with a rubber head you’d use to clean out a bowl, not the kind you’d use with a grill.) Go with quality, the cheap ones break too easily. The process of making a needle from a spatula is the same as from a flat toothbrush. My sister prefers the VERY high end ones which are flexible and essentially unbreakable. With one of those, she can do 3 to 5 stitches in the time it takes me to do one. (She also does a looser stitch than I do… its been said my rugs could double as bullet proof vests.)
I had seen the toothbrush rug
I had seen the toothbrush rug on a hgtv show once and was going to order the video but never did. Figured I would pay the $25 and never get around to it. I made my own tool from a denture brush from drug store and it sat it a drawer for two years. I happened to run across your video a week ago and have started one using old bed sheets. Its ok but a little bowl shaped. I saw in another post about using increase stiches (would that be 2 knots per hole, I dont crochet or knit so not familiar with terms) I was trying just putting doubles (doing oval) at the turns, just a few. Do you think I should do more to prevent the bowl shape?
I did see on that show a easier way to get strips than cutting. Measure the width of your strips across the fabric and cut about 3″deep then tear the strips the rest of the way. Be sure that you are tearing the length of the fabric. You can’t tear it the other direction. (tear the same direction as the salvage edge of fabric)
Thank you for your video.
(I pinned mine to the my pants to start while watching your video)
The fabric can be torn either
The fabric can be torn either lengthwise or crosswise. I do it all the time. The only difference is that the crosswise direction is a teeny tiny bit stretchy but nothing that you're going to notice or that will make a difference in your rug.
Actually, while you can tear
Actually, while you can tear something (like sheets) lengthwise OR crosswise, crosswise won't usually tear straight... You'll give it a good strong rip, and it takes off diagonally across the material. You're better off tearing lengthwise as the first commenter described, and getting even strips.
Your rag rug instructions are
Your rag rug instructions are great! That’s so nice of you to post this. Thank you!!!
Uh..ok..I can see it now!
Uh..ok..I can see it now! When I throw my rug on the floor and start stomping and jumping up and down yelling. "be a rug, be a rug"...they'd have me in the looneybin within the next 2 hours! I normally crochet all my rag rugs but this techinique has intrigued me...I've just GOTTA try this now!!!....Arkansas
Still working on my
Still working on my rug..getting there. I thought I would let you know…I showed my “new project” to my mom. She said a few of her sisters made these kind of rugs. They also used this technique to make chair pads with ties for wood chairs (kitchen chairs mostly) so the wouldn’t slip off chair.
Thank you Lara-Jane for sharing this! I just love a new project!
Any one know how to figure out how long to make starting run to end up with certain sizes on ovals?
OH, I have another question. Does anything significant happen the first time rug is washed in washer? Shrink, flaws stand out more, gets bumpy, or alot on strings come off…etc..
to do ovals I make a chain (
to do ovals I make a chain ( like you do for the round) and just start stitching down the side add a few stitches on the ends and go up the other side and add a few stitches on the other end. It takes a few rows around to start lookin like a rug. Ive done 12 inch chains and for runners I did a 16 inch chain . They are beautiful. I taught my 2 sisters this past weekend and they love it. Thanks for putting this on video. I also found working on a table helps you see its laying flat.
Hello!! I am so excited to
Hello!! I am so excited to have found your videos!! I want new rugs for my home and after seeing the prices for simple cotton rugs ( 9 x 12 = $399.00 or more) and what they made my husbands face do..not pretty…I had almost given up!! I am not a great sewer and these look like I just might be able to do it!! I would like to try a square one and could use any help on finding videos to do so..thanks again and love the website will be sure to visit often…Jodi from Vermont
Quality content is the
Quality content is the crucial to be a focus for the users to pay a quick visit the website, that's what this site
is providing.
Finally! Video that actually
Finally! Video that actually shows close-up exactly how to do this! Thank you, Rag Rug Cafe!
izzie, here’s the math according to Aunt Philly: After deciding how big an oval you want, subtract the width from the length. For a rug that is 18″ x 36″ you will need an 18″ staring row.
Okay, I got the videos
Okay, I got the videos working now…. I am a long-time crafter but have a friend who is not. We are going to try to make one of these rugs together; I like the idea that neither of us is an ‘expert’ trying to ‘teach’ the other.
We will dutifully jump up and down on our rugs and yell….
How is everybody doing??!
How is everybody doing??!
I am making a rug for each of
I am making a rug for each of my two sons...i am making one out of old jeans and one out of old towels...i love them!! so fun and easy to make, thanks to your wonderful instructions!!!
Thanks for your effort for
Thanks for your effort for composing “Reply to comment | Rag Rug Cafe”.
I reallymight absolutely be coming back for even more reading through and
commenting shortly. With thanks, Sylvester
thats cool that u put this on
thats cool that u put this on here, i searched every where trying to figuer out how to start since an instructor lady wouldn’t say unless we bought a class, thnks!
Wow, saw someone make these
Wow, saw someone make these 15 yrs ago and I never forgot how easy it was to make, and how pretty. Today, now that I finally decided to make one, I have spent 4 hours Googling to try find a pattern, only to find braided rugs and crocheted rugs. Disappointing. Then, finally, on page 11 of my search, there it was. I cannot tell you how excited I am. Thank you, thank you for your wonderful, informative videos. I can’t wait to start.
i was woundering the tool
i was woundering the tool that you made with a wire hanger how did you make that? i love your videos and i want to get started i have a hanger here and wanted to know how you make it.so that i can get started on my rug
The only contact these people
The only contact these people have had some results while taking it internally but it will decrease the
production of bacteria, and creating an infection that shows rashes and pimples can flare up.
Another reason I am a vegetarian and I never have a significant effect on
your baby. CausesThe causes of adult acne killer fade and clear scars and stains, white,
black, pink and blue. When you use honey for Acne Killer,
it usually requires two or three a week, my skin started
peeling.
I just got a tool and used
I just got a tool and used your video to help me learn this craft. I am working on an oval and am getting some holes. should I make the stitches tighter? Once I get the hang of this, I will start a rug….. thanks for the great videos.
Hi Sherry. Yes! Go tighter
Hi Sherry.
Yes! Go tighter and I think your holes should disappear.
The trick is to find the right balance–tight, but not too tight.
You’ll find that happy medium in no time.
I got my Quiltmaker today and
I got my Quiltmaker today and read about the toothbrush rugs got to my computer and found your site. Wonderful and new to me as living in Finland all our rugs are made by weaving. This is a wonderful way of getting rid of scraps left over from all my patchwork projects. The tutorial was very easy to follow so now I have to fix me a tool for doing it.
You saved my day.
Ulla
Awesome, awesome, AWESOME!!
Awesome, awesome, AWESOME!! Thank you so much for your videos and excellent directions!I made a tool out of a spatula handle and grabbed some scraps. I'm not a crafter, but I have a great start on a rug already! Like others have mentioned, I have a bit of a sombrero look going on because I'm trying to find just the right amount of increasing stitches. Other than that, it's been an easy and addictive process!
Thanks again for the great tutorial and the helpful hints from other posters.
I loved the videos. Thank you
I loved the videos. Thank you for taking the time to do them. On the questions of curves and corners; in crochet 4 stitches in the corner turns it nicely. On the next round, you place 4 more stitches in the middle of the previous 4 and on and on. Keep it to an even number and you can have nice sharp corners.
graphically:
\| | | | | | |/
\| | | | | |/
\| | | | |/
each side would have extra 2 stitches, one on each end, thus allowing a turn and widening the piece incrementally.
I just wanted to say that i
I just wanted to say that i loved you how to videos i found on youtube i had neve heard of rag rugs before .. I really wanted to get started and didnt want to wait on the tool like you... I went to walmart and bought a set of yan needles (4 for !.47) and they work great ...
Thank you for the video. I
Thank you for the video. I have made crocheted tams for my daughter for years, and because of this I knew that there would be a need to increase as a circle was made. The reason a circle "buckles" is because there are not enough stitches. The same is true for the oval, however the increases would need to be at each "corner" rather than spread throughout.
thank you SO much!! I had no
thank you SO much!! I had no idea what I was doing wrong but all I knew was that I had a bowl!! :) I am glad there are these comments as well as the video :)
They are employed as a whole
They are employed as a whole accountant corporations, but
can secure a job opportunities within law enforcement, authorities,
small or maybe mid-sized businesses, relief sectors, bank,
brokerage, insurance plan, and private exercise.
I have no crocheting or
I have no crocheting or knitting experience so am not quite sure about the "adding stitches" part... Do I make two passes through the same "hole" in the rug?
Thanks for taking the time to make this tutorial!
Thank you so much for
Thank you so much for teaching us this method of toothbrush rug making, it would be neat to take to appts and work on while waiting and also traveling.
Our pleasure! Thanks for
Our pleasure! Thanks for thanking us, Peggy! :)
Thank you so much! I've been
Thank you so much! I've been trying to teach myself to crochet just so that I can make rag rugs, but figured that if I was having problems with the yarn, I'd never be able to do it with fabric strips. I followed your tutorial and now have a 7 1/2" diameter start of a circular rug for my kitchen. It looks great and I can't wait to finish!
thanks for the pattern, a
thanks for the pattern, a lady showed me this 7 years ago but I didn't remember the stitch, I still have the tool with fabric on it when I started it back then.
I just viewed the dvd oval
I just viewed the dvd oval rag rugs by aunt phillie- i feel ripped off! there was no setup no intro and no paper included with written rug directions and it cost 35 bucks and shipping!!!! what a rip off...
it seemed like she couldnt be bothered to watch her video as a person who hadn't made a million rugs, and SHE WOULD THEN see THAT BY explaining a setup/intro would be a MUST!
THIS OVAL RUG video starts after she had already cut strips and put them together on a pin and pinned ot a mat and begun making rug -WHY IN THE WORLD DIDNT SHE START AT THE BEGINING?????
SHE GIVES NO EXPLANATION AS TO HOW SHE GOT RUG STRIPS ATTATCHED TO PIN & MAT AND NO DISCUSSION AS TO HOW STRIPS ARE JOINED (OR NOT) B4 PUT ON PIN, AND VERY LITTLE EXPLANATION FROM THERE ON.
she tells you one time in detail how to do each type of stitch, and then rambles on and quickly stitches so you have no idea what she is doing.
the video was less than half an hour long!!! what she does after the rip off how to (that isnt) is she sits there and shoves jesus down your throat@!!! tells how he made such a change in her life!!! HOw bout not ripping people off by saying the dvd will teach you everything and it skips half the rug making!!!!!!!!!!!!!
I AM ANGRY I WASTED MY MONEY!!!! RIP OFF. DO NOT BUY, TOO EXPENSIVE AND I FOUND MORE DETAILS FOR FREE ON UTUBE VIDEOS.
I totally agree that aunt
I totally agree that aunt Philly's dvd is very vague, hard if not impossible to learn from and a rip off. I am a very fast learner and I had a heck of a time understanding what she was saying. I took one class from a man!!!! and after he showed me how to start the rug it was smooth sailing from there. She even has the nerve to say on her website that it has come to her attention that there are some people out there who shouldn't be teaching classes. Oh really??? She even says that the best way to learn is to buy her dvd and contact her if you have any questions. The problem there is that she never answers her phone because she's always gone to some show or other promoting her patterns and dvd.
I don't understand why you
I don't understand why you feel you've been ripped off by Aunt Phillys dvd? I bought it, and kept watching it over and over, and made a beautiful rug. She did an amazing job showing and explaining what she was doing. My friend just recently purchased a rug kit with the dvd from "Rugging with Julie", and it was nowhere as good at explaining how to make a rug. So if you took the time to watch and listen you might have learned something that she taught me, and that was how to make a beautiful rug. I have learned how to start a rug, and with her instructions I could teach this from just watching her and making one of these rugs. And also, I've called her twice, and she answered every time. If you checked out her website, and seen her schedule you would see when she is home or not!
I am wondering if you got the
I am wondering if you got the same DVD as I did because she absolutely shows you how to tear your strips, how to start your row, and how to make the stitches!!! I did have to rewind it a lot till I got it, but she does show you everything you need to know about making a toothbrush rug. Why would you need an intro, or instructions for that matter? Yes, it took about 30 minutes to show you how to do this, so why do you need hours and hours of explanation? I eventually got it after watching it a few times, so why are you making it look like she showed you nothing? This dvd was the best money I ever spent on learning how to do this craft, and I made an absolutely gorgous rug out of it. I could actually teach this to people from what she taught me! EVERYTHING you say here that she didnt do, she actually did do, so just because you didnt get it, you shouldnt tell people its a ripoff. I am a visual person, and by watching her over and over, it clicked... I'm not going to tell you to watch it again, because obviously you cant understand basic instructions, and need 50 hours of someone showing you in slow motion what to do, geez! Your wrong in everything you said, and I'm here to say your WRONG!!!
I've been trying out making
I've been trying out making rag rugs by crocheting fabric strips, but this process seems a lot faster. You are my toothbrush rug making hero! Great tutorials, thank you!
Do you have to add any
Do you have to add any additional stitches?
Yes, around the corners
Yes, around the corners
So I have tried making this
So I have tried making this rug I have not gone way far but I noticed it starts to make a bowl shape. Can You please tell me what I might be doing wrong? Any suggestions?
Just need to add extra
Just need to add extra stitches around the curves if it is "cupping" Do 2 stitches in the same knot every few stitches.
I watched your videos the
I watched your videos the other day and thought they were wonderful.I was so excited, I started a rug the same day and it started to cup. I came back to read and try to find out what I was doing wrong. I have read the entire script and have noticed a lot of people have the same problem of the rugs cupping. Some people have explained that there needs to be increases. I am frustrated because I am a novice crafter and I don't understand what increases are and what that word literally means as far as rug making. How many stitches in each hole is an increase? When should I make the increases. Help! Explain as if we have never heard the word increase before. I would be so grateful for any information. Thanks!
his new Tren and pole are
his new Tren and pole are incredibly better there should be no perplexity.
From a legit grain obtain, and I did a melting stage ensure that you center magnetic resonance
fools! obtains, however just Masteron 100 (Drostanolon Propionate)
20ml Roos Lion are shy that Clomid declined that gains (please also note
that not one person I've ever heard about has saw this.) Masteron 100 (Drostanolon Propionate) 20ml Roos Lion loss of started and so deceived, take note,
he'd but not deduce this from I've found that cutting down check out so early like that makes me feel so much better hard and dry.
As a result virtually from about 6 weeks out until showtime, the one thing that turned appeared to be primo got displaced
at a month out, and gh, mast t, and tren star were fallen one
week on. Stay tuned in in right after couple of weeks as I
lay out my offseason bike and what must be done to end up a national point Fabulous Heavyweight body builder.
According to Digital Spy
According to Digital Spy (Langshaw, 2012) and Game - Pressure (2013), of the fourteen MMOs that have been released on the Xbox
360 since 2006, ten been cancelled. Unfortunately I did not write down the credit income with the
British TDs because I did not know back then that it will be important.
world of tanks cheats 2014 features a big function throughout Us Way of life.
Who knows where to download
Who knows where to download XRumer 5.0 Palladium?
Help, please. All recommend this program to effectively advertise on the Internet, this is the best program!
Undeniably consider that that
Undeniably consider that that you said. Your favorite reaason appeared to be aat the net the simplest thing to take into accout of.
I say to you, I certainly get annoyed while people think about worries tthat they just don't recognise about.
You controlled to hit the nail upon the highest and defined oout the whole thing without having side effecxt ,
folks coulpd take a signal. Will probably be again to gett more.
Thanks
Post new comment