Toothbrush Rugs - Complete Video Instructions (Beginners)
 Delicious
- |
 Digg
Digg- |
 StumbleUpon
- |
 Facebook
- |
 Technorati
On this page you will find explicit step-by-step instructions that show you how to make a toothbrush rag rug! Yes, everything a beginner needs to know!
Toothbrush rugs are one of the easiest and quickest rag rugs to make. They are easy to learn, inexpensive to make, and the result is gorgeous!
Most other instructions that I've come across on the internet assume some previous knowledge of crochet or knitting. But, believe me, you don't need any experience to learn how to make these rugs! In fact, I just learned how to make these two weeks ago, and I am not very crafty at all.
I taught myself how to make these rugs in one day, and was SHOCKED at how easy it was. I figured it out in one evening, piecing together a number of different directions I found online.
I made two very small experimental pieces that looked awful, but soon enough my rug started to look good and I started a rug for real that very first night. The next day I worked on it ALL DAY LONG (8 or 10 hours?), and my first rug was complete! I was so satisfied and proud of myself!!
As a result, I vowed to share my knowledge. I don't like learning from diagrams, so I wanted to actually SHOW how to make the stitch. I just had to share my easy rendition.
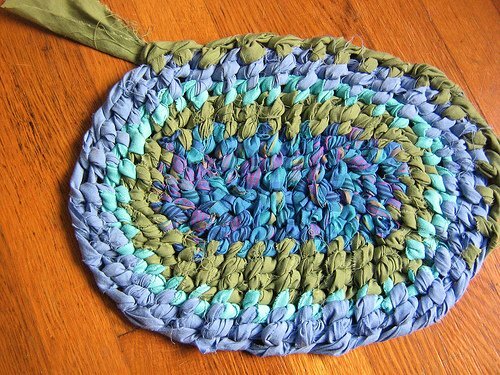
Here is an example of what my instructions can help you to make. This is the first rug that I created (after a few false starts, of course).

START BY EXPERIMENTING
Material
To start experimenting, you will need two long strips (each approx. 2 feet long) of fabric, yarn, ribbon, or whatever you have on hand.
Tool
You will also need some kind of tool to help you pull the strip through--basically, you will need a "big needle". Many people use altered toothbrushes. The bristles/head are cut off and the severed end is filed to a point, like the pointy tip of a needle. The untouched end gets a hole drilled in it, like the eye of a needle.

Other people have used crochet hooks, or have purchased a tool from the "Aunt Philly" website.
![]()
When I was learning, I wanted to experiment right away, so my partner helped me bend part of a coat-hanger into a tool. Not perfect, but it works! Even if you don't have any kind of tool, I suggest experimenting anyway. How about a short, pointy pencil with your fabric taped to the end? The only reason you need a tool is to help you push your material through a tight hole.

Introduction
Let's watch the following movie. In it, we jump right into seeing the very basic knot that you need to know. Don't worry if you don't quite get it; this is just to give you an idea of what is to come.
Okay, now you've seen that the idea is pretty simple!
LET'S MAKE A RUG!
Making Lots of Fabric Strips
To make a whole rug, you will need lots of one-inch strips of material. Any material will do (try cotton or wool), but dry to avoid very stretchy material (like spandex, for example) because it's harder to work with. Basically, just use whatever you have on hand to begin with. To start a rug, I usually get around twenty strips "ready to go", which means that they are cut into one-inch strips (anywhere from 3 to 6 feet long), I've removed any annoying strands that are hanging off the strips, and I've cut small holes in the ends (discussed in the movie below).
Starting Your Rug
In this movie we start a circular rag rug properly, and we watch how to attach the strips together when your strip gets too short. (By the way, we start with circular rugs because they're the easiest. Ovals are pretty easy too, once you get the hang of the circle.)
3. So, here we go! Let's make a rug!!
My best advice is to just keep plugging away on whatever you've started. At first, it will probably look like a horrible jumble, but after you've gone around a couple times (for example, you've made like fifty to seventy knots [but don't count them or anything!]), you'll suddenly realize that you're starting to figure it out!
Once you feel like you've got the basic idea, it's time to start over with new material and actually start again with a perfect start.
PS: If you really want to make your rug look good, see the next tutorial (for intermediate ruggers)!